Monday, September 9, 2013

Comfort Food - Pina Colada Pudding Cake

Do you like pina colada? I actually don't like the cocktail so much, they're usually a tad too sweet for my drink tastes - but I do love the pineapple and coconut combination. It's a classic! Remember my Greek Yoghurt Souffle with pineapple, mango and coconut fruit salad? It was amazing! Loving the combo, when I saw a recipe for pina colada pudding, I was intrigued. And then disappointed and overwhelmed by all of the sugar in it. So I decided to make my own version, using a basic self-saucing pudding recipe as my base. Then, instead of using regular flours, I decided to use coconut flour, for fairly obvious reasons and superfine polenta to give it a nice golden colour. Which then makes this pudding cake gluten free!

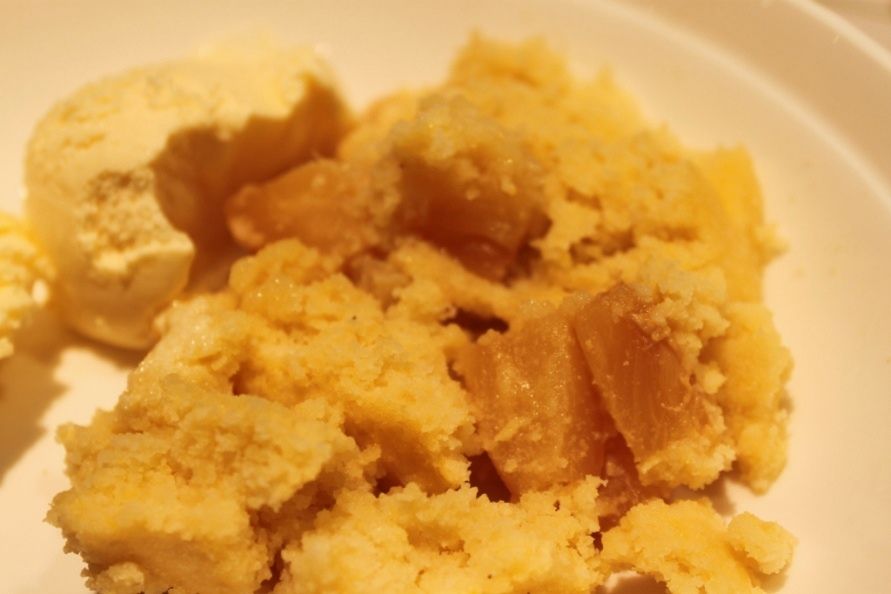
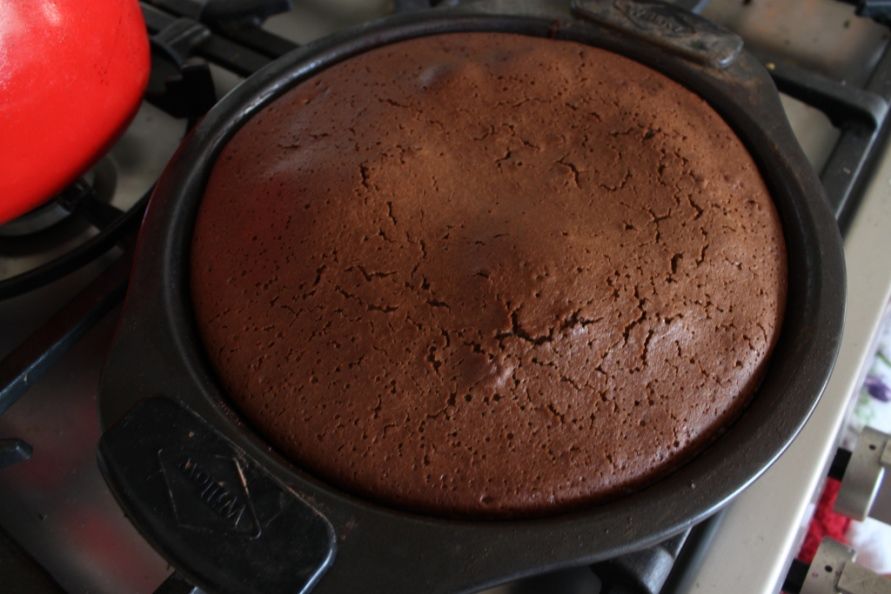
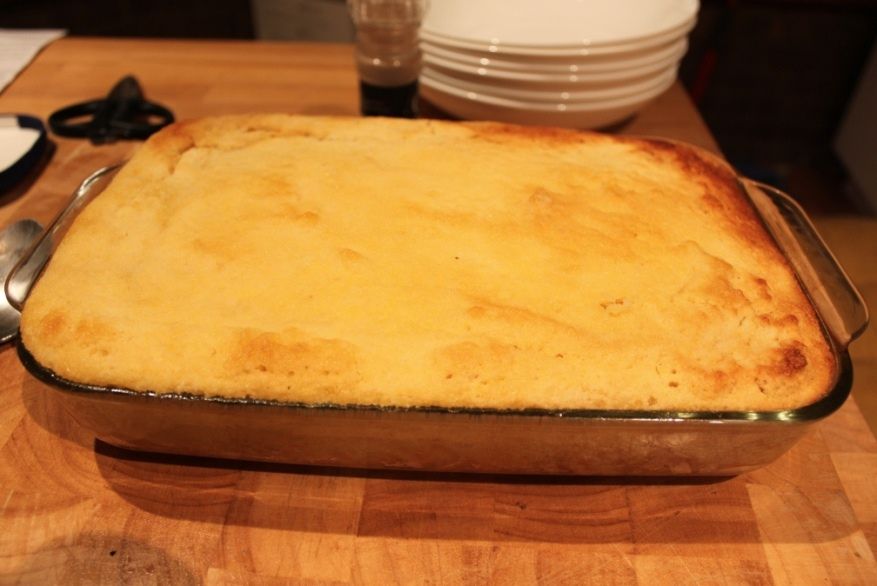
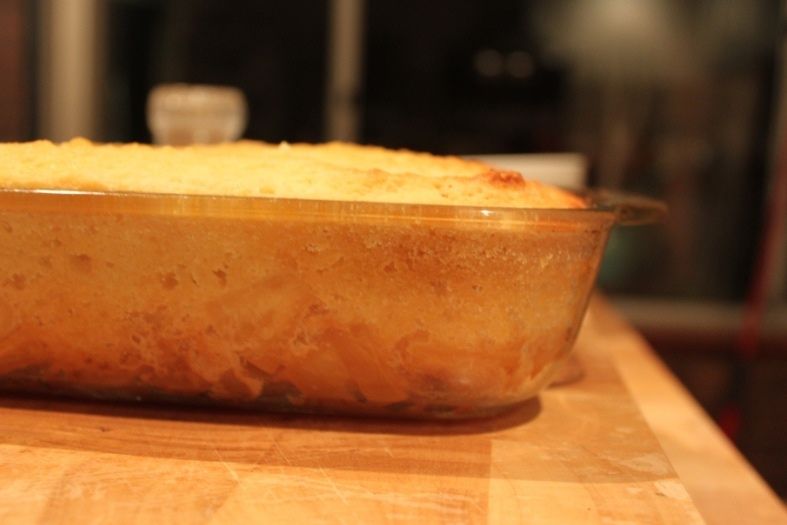
It should be saucy at the bottom, but the pictures I've got show mine didn't turn out super saucy. Namely because my dish wasn't large enough, and I spilt most of the boiling water on the floor while trying to put it in the oven. Not my finest culinary moment, and I knew it was a bad idea when I was doing it. With an audience. But the cake still came out nice and moist and the pineapple pieces added a nice juiciness. That's why I've called it a 'pudding cake' instead of a straight pudding.

It is a decidedly unglamourous cake in presentation - but great for putting out as a serve-yourself dessert for a large amount of people. It will serve 10-12 easily. And then if you're lucky, you'll have leftovers for breakfast the next day (or three) reheated in the microwave!


Pina Colada Pudding Cake

825g can pineapple pieces - juice drained and reserved
1 tbsp dark brown sugar
2 tbsp dark rum
1 cup superfine polenta
3 tsp baking powder
1 tsp bicarb soda
2 tsp vanilla extract
2 small tins coconut milk
2 eggs, beaten
2 tsp honey
2 cups boiling water
1/4 cup sugar

Preheat oven to 160C

In the bottom of a big casserole dish, empty the drained pineapple pieces, the dark rum and the dark brown sugar, stir to combine, then spread evenly over the bottom of the dish.

In a large bowl, whisk together the coconut flour, polenta, baking powder and bicarb soda. In a smaller bowl, whisk together 1 cup of the reserved pineapple juice, coconut milk, eggs, vanilla and honey. Whisk together the liquid mixture into the dry mixture, then spread this batter over the pineapple.

Sprinkle the sugar over the top of this mixture, add the remaining pineapple juice to the boiling water and carefully pour this over the top of the batter. Don't mix it in.

Pop it in the oven to bake for approximately 50 minutes, or until the cake is cooked all the way through, and the top is golden.

Serve warm with vanilla or coconut ice cream!

Tuesday, September 3, 2013

Fathers' Day Part Two - Malteser Cake


Due to popular demand, this is the recipe for the Malteser Cake I made to go along with the Chocolate Beer Ice Cream for Fathers' Day. Maltesers are my dad's favourite chocolate, so when my brother spied this recipe online, he forwarded it to me - knowing it'd be perfect. I've only slightly adapted it. The big difference is that mine was a flatter, fudgier texture cake (almost like a brownie) so it's only two layers. And I used two types of brown sugars and added malt to the cake as well. I am also not the best decorator in the entire world. But it was ridiculously delicious! Enjoy!


Malteser Cake
sightly adapted from here

Cake
1/2 cup dark brown sugar
1/2 cup brown sugar
3/4 cup milk
125g unsalted butter
3/4 cup SR flour
1/2 cup plain flour
1/2 cup cocoa powder
2 tbsp malted milk powder

Icing
185 g butter, room temperature
3/4 cup malted milk powder
2 cups icing sugar
1-2 tbsp milk

Ganache
300g dark chocolate
1/2 cup cream
30g butter
450g maltesers for decoration

Preheat oven to 160C. Grease a 20cm cake pan with butter and dust with cocoa

Place brown sugars, milk and butter in a glass bowl and melt in the microwave, stirring every minute until mixture is completely smooth. Allow to cool slightly.

Whisk flours and cocoa powder together in a large bowl, then whisk in the butter mixture until smooth. Then whisk in the egg.

Pour into cake pan, bake for 45 minutes, or until a skewer comes out clean. Set in the pan to cool for 5 minutes, then transfer to a wire rack to cool completely.

To make ganache: place chocolate, cream and butter in a glass bowl over a pot of water (do not allow bottom of the bowl to touch the water) heat to a simmer and stir the mixture to melt together and create a smooth mix. Take off the heat, set bowl aside to cool for an hour or so until spreadable.

To make icing: beat the butter with an electric beater until soft and creamy. Beat in the icing sugar and malt powder, adding extra milk as needed to make a smooth mix. Add 2 tbsp of the ganache.

To assemble, cut the cake in two (when completely cool - don't be impatient like I usually am!!) then spread the icing mixture on the bottom layer, then carefully lay the top back on. Spread the ganache over the entire cake and decorate with Maltesers. If they pop off, dip in more ganache and stick back on.


Sunday, September 1, 2013

Fathers' Day - Chocolate Beer Ice Cream


One of the funniest memories I have of my dad was from when I was in high school. As part of the Home Economics course, students used to occasionally sell their cooking to the teachers and staff at the high school. It used to raise money for the department and school, so my mum who worked in the high school library would often bring home various things they'd cooked. Generally, the food was pretty good.

One time, they did a proper fundraising drive and took orders for various individual sized pies by the dozen. Mum bought a dozen chicken, a dozen beef and a dozen apple pies that went into the freezer and as needed, would get taken out and heated in the oven. I came home late one night and felt like a chicken pie for dinner and going through the freezer, couldn't find any. Mum told me not to be ridiculous, they'd left one there for me. She came over to have a look and lo-and-behold, there was no chicken left, only apple. You could tell by the pastry shape cut and stuck to the top pie crust. Mum was completely flummoxed. Where had it gone? Which was when dad piped up, "I think I'm eating it."
"What do you mean, you're eating it? I just gave you dessert!"
"Yeah, it's a chicken pie."
"No, it's apple pie and ice cream."
"No. It's a chicken pie. With ice cream. I did think it was weird when you gave it to me."
"So why didn't you say something?"
"I don't know, it's good, so I ate it."

Now whenever I see chicken pies on a menu, I think of dad and his unusual dessert and can't help but laugh. So in honour of Fathers' Day, I'm making him this beer ice cream. I think it'll go better with chicken pies than vanilla ice cream! It's malty and rich and all sorts of delicious! Happy Fathers' Day!!


Chocolate Beer Ice Cream
adapted from here
355mL chocolate stout
2 tsp vanilla extract
1 tbsp cacao nibs, lightly crushed in a mortar & pestle
3/4 cup white sugar
1/2 tsp salt
6 large egg yolks
2 cups thickened cream

Simmer 235mL of the chocolate stout in a frypan until it has reduced by half, set aside to cool slightly. Put the remaining beer, vanilla, cream and crushed cacao nibs in a bowl, stir to mix. Add the reduced beer and mix well.

Prepare an ice bath, and place a large bowl in it with a fine mesh sieve over this.

Whisk the sugar, salt and eggs in a large saucepan until smooth. Then whisk in the cream & beer mixture. Slowly heat the mixture to medium high, constantly stirring until the mixture thickens. About 10 minutes.

Pour the cooked mixture through the sieve into the bowl in the ice bath and stir constantly until the mixture cools. Cover with plastic wrap and refrigerate for 8 hours until cold.

Churn in ice cream maker as per manufacturer's instructions, then freeze again until firm. At least a few hours. I did mine overnight due to time restraints.

Wednesday, August 28, 2013

Red-sotto - Mushroom and Beetroot Buckwheat Risotto

My cousin told me off the other day for posting yummy stuff on my blog, instagram and facebook page and not inviting her over to eat it. So I organised a cousin's catch up to rectify that. Pretty much everything that I post are just the dishes I cook for my my husband and I day-to-day. We both love food, so I try to keep our daily meals interesting. However, when it comes time to cook for other people, I get quite anxious. I know what I like, I know what Lance likes...but what if other people don't like it? If a dish misses with the two of us, there's always grilled cheese as a back-up. You can't really do that with guests. So I get complete mental blanks when I have to decide what to cook for other people.

My two go-to styles of dishes for dinner parties are pastas and risottos. The main reason being that they're easy to cook enough to feed a large amount of people all at once. Because this dinner party was family, I thought instead of playing it safe and making a chicken and corn risotto or chicken and pumpkin risotto - two of my favourite delicious and generally inoffensive flavour combinations, I thought I'd be a little more adventurous and use beetroots to make this "red-sotto".


The first time I made this, I already had some roasted beetroots and leftover lamb from a weekend roast. I actually roasted extra beetroots after seeing a similar recipe on Potlicker and falling in love with the colour. Knowing I needed a red risotto in my life. I then stirred some shredded lamb through at the end for extra oomph. But it's delicious just as a vegetarian risotto. The beetroot really is the star here. But because the lamb/beet combo worked so well, I chose to serve it with lamb steaks on the side for my cousins. Then, because I was feeling playful, I crumbled sheep's milk fetta over the top. Lamb and sheep's milk - get it? Just like I used red onion and red wine to go with the red beets. I used buckwheat instead of arborio rice, which means it needs to cook a little bit longer and isn't quite as 'creamy', but on the positive side, you can pop the lid on and let it simmer away while you socialise.

It's a very rich, earthy dish, perfect for the current warm days and chilly nights. It also pairs beautifully with the reds we just re-stocked from my favourite winery in the entire world - Cape Naturaliste. The Cab-Sauv has a boldness that holds up to these strong flavours really well.


Note the stained pink fingers!


Mushroom and Beetroot Buckwheat Risotto
4-5 med red beets
splash balsamic vinegar
1/4 tsp caraway seeds
8-9 small field mushrooms
2 tbsp olive oil
2 cloves garlic, minced
1 large red onion, diced
1 tbsp finely chopped fresh rosemary
1 tbsp finely chopped fresh sage
1 cup buckwheat
1 cup water
3 cups vegetable stock
1 cup red wine
1 tbsp butter
sheep's fetta to serve

Preheat the oven to 175C. Trim the tops and tails of the beets, place in a roasting tray, splash with balsamic vinegar and caraway seeds, then cover tightly with foil. Roast until tender, about 45 minutes. Allow to cool.

Heat the oil in a suitable risotto pan, then add the onion, garlic and a pinch of salt. Cook until the onion is translucent, then add the herbs. Stir well until fragrant, then add the buckwheat and stir to coat each grain in the oil and onion mixture. Should take a few minutes.

Add the wine and cook while stirrying until the wine is absorbed.

Put the mushrooms in a food processor and pulse until roughly chopped, stir into the buckwheat mix.

Peel the beets and place in the food processor with 1 cup of water. Puree until mainly smooth. Stir this into the buckwheat mixture, cooking until the liquid is absorbed.

Your choice here is to then cook like a traditional risotto, adding a little stock at a time. Personally, I added all of the stock, covered with a lid and simmered it for 30 minutes untl the liquid was all absorbed. Opening here and there to stir and check that it had sufficient stock.

At the end, stir through 1 tbsp butter to make it all glossy and serve with the sheep's milk fetta. Also pictured here, lamb steaks and a dressed kale salad.

Wednesday, August 21, 2013

Comfort Food - Avocado Soup

Have I told you about "The Nanna Shop" before? I'm not sure, but it's very likely as I shop there all the time. It's actually called Cannington Fresh Markets, but my nanna used to live just down the road from there. Growing up, my siblings and I used to walk with her down to The Nanna Shop to buy her a newspaper and us some lollies. It's changed a lot over the years, it used to have a butcher and bakery inside the store but now it's just the one big shop. It has lots of good fresh produce, imported sauces, tinned goods, continental fare, cheese and smallgoods. Usually, if a recipe calls for a slightly left-of-centre ingredient, my first port of call to try find it is The Nanna Shop. Funnily, now my husband and his sister, along with various friends and even my work receptionist now refer to it as The Nanna Shop as well!

The main reason I shop there frequently is for the fruit and veg. And one of the best things they have a buckets of produce at the back of the store. If you can use it, these bulk buy buckets are excellent value. Especially for those things that are a little on the expensive side normally, like mangoes, mushrooms and avocadoes. Usually the produce in the buckets are slightly smaller than what is normally sold in the per kilo section, but is still excellent quality. As summer approaches, I always head straight to the back first, hoping that mango season has started. It's one of my signals that summer is on it's way.

One thing I always buy there is bags of avocadoes. Always. I love avocadoes. Occasionally, I end up with too many and the two of us can't finish them before they've gone a little too soft. Which is where this soup came in. Creamy and subtle and oh-so-easy, this is a great vegetarian soup by itself, or as served here, awesome with the chipotle chicken as an extra kicker. Especially in this got-cold-again weather. And it would be remiss of me to not mention that crispy bacon would then make it a Vegetarian Recipe Improved By Bacon.

The wine in the last photo is from Darlington Estate. I highly recommend you eat there at some point. Awesome food.


Chipotle Chicken
2 chicken thighs
1/4 cup chipotle sauce
1 tbsp rice bran oil

Avocado Soup
adapted from here
1 tbsp rice bran oil
1 onion, finely chopped
1 garlic clove, minced
5 cups vegetable stock
3-4 small ripe avocadoes
2 stalks silverbeet, centre white bit removed and shredded.
Handful coriander leaves for garnish
2 jalapenos, sliced, for garnish

Pour the chipotle sauce over the chicken thighs and allow to marinade for 20 minutes or so. Heat the oil in a frypan, BBQ or grill and cook the thighs until done, about 5 minutes per side. Set aside, but keep warm.

Heat the second lot of oil in a pot over a medium heat. Add the onion and cook until translucent. Add the garlic and cook another few minutes until very fragrant.

Add the stock and bring to the boil. Reduce heat to low, add the silverbeet and simmer for 5 minutes. Take off the heat.

Add the avocado and blend the whole thing with a stick blender until smooth. Return to a low heat and simmer for 5 minutes, or until warmed through.

Slice chicken, then put in the bottom of the serving bowls and pour the soup over the top. Garnish with jalapenos and coriander.

Serve with corn chips, if desired.


Wednesday, August 14, 2013

Obsession - Pretzel Rolls


Pretzel Rolls. If you are like me and love nothing more than sitting down to freshly baked bread, still warm from the oven , smeared with butter - then these two words are going to change your life. One of the sponsors of the Sweet Escape retreat was LaBriola bakery, and they gave Alejandra (and hence us) a whole bunch of pretzel rolls. And they were good. Addictively good. Can't eat just one good. When I got home, I immediately googled recipes for pretzel rolls, needing them in my life. I've made these twice now and love them. They're not quite as good as the La Briola ones, but they are definitely an adequate at-home substitute! Both batches were gobbled up by my guests pretty quickly, so that's a fairly good indication of yumminess.

The first time I made them, I made the dough in a stand mixer that is woefully poor at actually mixing more than the small centre of the bowl where the blade sits and had to knead the rest in by hand. I can't wait til I finally get around to saving enough for a KitchenAid! The second time I made them, I used a breadmaker to mix the dough. This method worked well, but the dough ended up a bit sticky, so I needed hand-knead in some extra flour. Until I get my KitchenAid, I will be sticking with the breadmaker method, and checking earlier on to see if the dough is sticky. If you have a good stand mixer, then that will work.

As I said, these are perfect with just some butter, but also great as slider buns. Let's face it - any time you need a bun these are perfect. I realised I forgot to take a photo of them sliced up with said butter or fillings - but I was too busy eating them. Maybe next time, I'll pop it on instagram


Pretzel Rolls
adapted from here

1 1/2 cups warm water (as hot as your tap gets)
1 tbsp dry yeast
2 tsp sugar
4 1/2 cups plain flour
1 tsp salt
4 tbsp melted butter
1 beaten egg for glazing

Poaching:
8 cups water
1/4 cup bicarb soda

Start by melting the butter, and setting aside to cool slightly.

Pour the warm water, sugar and yeast into the bowl of the breadmaker, stirring together. Leave it to sit for about 10 minutes until it's foamy.

Add the flour, salt and butter, then set the breadmaker on the dough setting. Watch as it comes together, and once it's all combined (about 10 minutes into kneading for mine), gently and safely touch the dough to see if it's 'sticky' to the touch. If it is, add a tbsp of flour at a time until it's not sticky. I added an extra 4 tbsp to mine.

Once the dough is a good consistency, leave the dough setting to finish and it will do it's first rise in the bowl of the machine.

For standmixer, follow the breadmaker instructions as above up until the rise - it'll need around 5-10 minutes of kneading time. Then cover bowl with plastic wrap and place in a warm position for 1-2 hours until doubled in size.

Lightly flour your work surface and drop the ball of rised dough out onto it. Knead lightly into a flatter disc and cut into 16 equal pieces for slider sized buns. Take each piece and roll around in both hands, so you have a smooth ball. Place on a baking sheet lined with baking paper. Repear with all the pieces of dough, leaving room on the tray for them to rise again. Place in a warm spot 30mins to an hour. They won't quite double again, but will look puffier.

Now it's time to prepare for baking! Preheat oven to 225C. Place the water and bicarb soda into a large pot and bring to a simmer. Beat the egg for the glaze.

Carefully slide each roll "flat" side down into the poaching water, let it sit for 30 seconds, flip it over and let it sit "round" side in the water for another 30 seconds. Flip it back over and fish it out with a slotted spoon and pop it back on the baking sheet, flat side down.

Brush each poached roll with the egg wash and slash a deepish line across the middle with a knife (if desired, you can sprinkle salt on top, too).

Bake the rolls in the oven for 15-20 minutes, rotating trays half-way through, so the rolls are an even golden brown and sound hollow when you tap the base. Allow to cool slightly before eating. Best served warm!


Friday, August 9, 2013

Entertaining - 30 Sucks Party

I had all sorts of good intentions of cooking something awesome this week AND taking proper photos of it. I really, really want to get better at doing that and stop using phone photos. But I also want to maintain a vaguely weekly post on this blog. Seeing as this whole week has been a blur of after work activity, full of bottom-of-the-fridge soup, baked beans and toasted cheese sandwiches - no real cooking for real photos eventuated. So I thought I'd do a post on a party my husband and I threw. We absolutely love entertaining and having people over, so I thought I'd add a few posts of our past parties to maybe inspire you when I don't have any recipe photos lined up. I thought I'd start with a party we threw for a friend almost exactly a year ago. Maybe you can use some of the details in a party of your own!


Last year, a whole bunch of my usual crew turned 30. And all over pinterest were photos of "30 Sucks" lollipop bouquets. Seriously, how did it know? Did the whole world turn 30 last year?? Seeing this, and having had many a Buffy conversation over the years with the birthday boy - the theme was born...30 Sucks. Double-meaninged "sucks". Perfect, right? Theme chosen, we got to work.


Front of the invitation
And when you open it up...
We were lucky enough that after the theme was picked, the party supply shop down the road were having a chuck-out sale of all their old Halloween stuff, in preparation for new stock. We were able to turn our games room into a haunted castle without a huge expense. I then made blood-rimmed wine glasses and little coffin treat boxes (complete with lollipop 'skeleton'). I also made jelly worms and labelled reddish juices as various blood types to go with the usual party fare.


We played vampire themed versions of normal kids party games. I love playing games at parties - even as an adult. I don't think it's nearly encouraged enough, except for at Kitchen Teas! Our games were "Pin the Bite Mark to the Victim", "Suck it til it Fits", "Pass the Suspicious Looking Parcel" and a version of musical statues, using horror poses as the "freeze".


A friend who couldn't make it came as a staked vampire!

And when it was time to make the cake, I went to my favourite go-to cupcakes - red velvet. Delicious and the colours suited the theme.


If you want any more details about any of this party, send me an email!