Tuesday, July 30, 2013

You Only Get One - Mexican Hot Chocolate Snickerdoodles

These are my husband's favourite biscuits. We both love the choc/chilli combination, so when I came across this recipe a few year's back on MlovesM blog, I gave it a go almost immediately. From first bite, my husband was obsessed. I've told you before that he takes biscuits to work for lunch - well, this is the biscuit that started it. He would call me from work and claim I hadn't given him any, because he'd eaten them all before lunch time. He would tell everyone that would listen that these were the most amazing biscuit in the entire world, that you'd have one and just constantly want more. That he was torn, between wanting the wholed world to taste them, but wanting to keep them all for himself. So he came up with a compromise - you only get one.

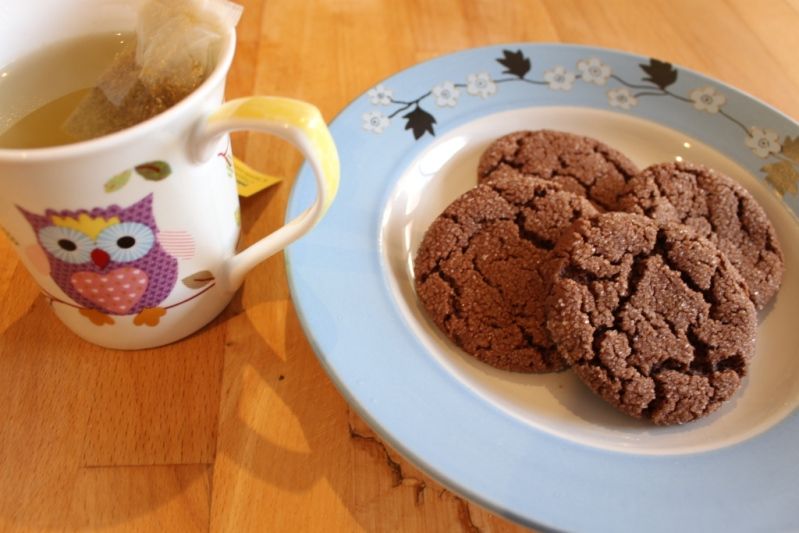
Just before he'd give someone one of these biscuits he'd tell them he was going to give them the best biscuit ever, but you only get one. You will only ever get one. And that's all they ever got. So, if you want more than that, you'd best make them yourself.

These are best baked just until cracking point, that way when they cool, they are slightly fudgy on the inside and crisp on the outside. My husband told me to point out that these biscuits are also one of the few he's ever eaten that are best eaten cold, not warm from the oven. This last batch I made with spelt flour, to increase the nutritional value. I haven't used spelt much before, but have read that you need to be a bit more careful with it, so when mixing the wet and dry, do it gently and stop as soon as it's completely mixed. Taste, texture and cooking-wise, they were identical.

As a disclaimer, I don't necessarily think these are the *best* biscuit in the entire world, but they are in my husband's world and they are pretty delicious!


Mexican Hot Chocolate Snickerdoodles
(makes about 24)
1 and 2/3 cups spelt flour
1/2 cup cocoa powder (I use Cadbury Bournville Cocoa)
1 tsp bicarb soda
1/2 tsp cinnamon
1/2 tsp cayenne pepper
1/4 tsp salt
1/2 cup grapeseed (or other neutral) oil
1 cup white sugar
1/4 cup pure maple sugar
3 tbsp milk
2 tsp vanilla

Sugar coating
1/3 cup white sugar
1 tsp cinnamon

Preheat oven to 170C

Whisk together flour, cocoa powder, bicarb soda, cinnamon, cayenne and salt.

In another bowl, whisk together oil, sugar, maple syrup, milk and vanilla. Pour this mixture into the dry ingredients, stirring gently with a wooden spoon until just combined.

In a small plastic container or jar with a lid, combine the cinnamon and sugar and shake to combine. Your biscuits will be dunked in this, so if you can't use it straight from the container, spread it back out in a shallow dish. I always have a container of cinnamon sugar ready for making these snickerdoodles!

Roll dough into small balls, then gently flatten into discs around the size of the biscuits you want. Gently push one side of the disc into sugar coating. Then place sugar side up onto lined baking trays. They spread a little, so give them room.

Bake until the cookies have spread and are crackly on top, around 9-12 minutes. Cool, then eat!


These also make amazing ice cream sandwiches!

Thursday, July 25, 2013

Inventing - Chick Pea Pancakes


Have you ever had that amazing feeling of thinking of something awesome for the first time? You feel like you've made this immense world-changing discovery because for you, it wasn't there, then you thought of it and it was. I've gotten it a few times in my lifetime. Sometimes for almost child-like discoveries of working out how something works without being shown. Sometimes for thinking of a novel way of using an ordinary household item. And sometimes for inventing recipes that blow my mind.

I know the I wouldn't be the first person to make these. I know that they possibly even exist as a traditional dish that's been around for generations. I also know that I invented them. In my world, anyway. In a food-related email discussion (I have a lot of those. A lot), we were talking about chick pea fritters and their awesomeness when I had a lightbulb moment. Chick pea pancakes. Savoury pancakes are already awesome, how about I make them with chick pea flour? I already had a Moroccan stew in the slow cooker that was requiring some form of side when I got home. What would be better than chick pea pancakes to dip in the saucy deliciousness? Armed with just this thought and an off-by-heart pancake recipe (more pikelet than crepe). I thought I would try it for the first time almost identically, minus sugar. I ramped up the baking powder and bicarb to ensure fluffiness with the new flour and voila. They were good. Really good.

This is pretty much going to be my go-to 'bread' recipe for all Middle Eastern and Indian dishes I make from now on, I'd say. My husband says they are like a cross between a pappadum and a paratha. So whilst it's probably not a new dish out there in the big wide world - I invented these. 100% from idea to finished product. And I'm pretty darned proud!


Chick Pea Pancakes
serves 4 as a side
1 cup chick pea flour
1 tsp baking powder
1 tsp bicarb
1/4 tsp salt
1 large egg, lightly beaten
1/2  cup water
1 tbsp butter (I actually use olive oil spread)
More butter/spread for frying

Whisk chick pea flour, baking powder, bicarb and salt together to fully combine.

Make a well in the middle of the dry ingredients and add the egg and water, whisk until a smooth batter is obtained.

Melt the butter in a fry pan on a low heat. Pour this into the batter whilst whisking and make sure it is fully incorporated.

Put the pan back on the heat and a minute or so later, pour the batter into the pan for making pancakes to your desired size. The first time I made big ones, the next time I made pikelet size ones.

Fry until bubbles start forming on the surface, around 3 minutes. Then flip over and cook for another 1-2 minutes or lightly golden on the other side.

Store on a plate in a really low oven to stay warm as you repeat the process until all cooked.

Sunday, July 21, 2013

Joining Bloglovin

So, a reader requested that I join bloglovin so she could keep up-to-date with my posts now that google reader doesn't work. I'm so not with it, in the world of social media these days! But I will, so that people who want to can keep seeing and reading my blog. Apparently that means adding this line, to show that I am me!

<a href="http://www.bloglovin.com/blog/9942659/?claim=n7twjrqhdxx">Follow my blog with Bloglovin</a>

I hope this helps everyone :)

Jenn xx

Summer dreaming - the Lychaloechee


When I got up this morning, there was ice on my windscreen and a bitter chill in the air. It was minus 0.6C. Two weeks ago, I was enjoying days in the low 30's. Now, well, now it's cold. Meanwhile, my newsfeeds on blogger and pinterest and instagram are full of fruity cocktails and balmy summer nights. So whilst I don't have the fresh watermelon or mango or berries to whip up a delicious summer cocktail, I thought I would console myself a little bit with the first cocktail I ever created - the Lychaloechee.

Being in New York, I really took to all the readily available and amazing Latin restaurants about. We don't have a great deal of Latin cuisine in Perth, although there was somewhat of a Mexican food revolution of late which I heartily support! But something we do have lots of here due to our proximity is good Asian food and good Asian grocers. One of my favourite things to have discovered back in my uni days was Aloe Vera juice. This is now readily available in most supermarkets. It's a sweet, still juice with little floaty bits of goodness in it. I usually get the plain one, but it also comes flavoured or sweetened with honey.

When my husband and I first moved in together, I introduced him to one of my favourite summer fruits - the lychee. Seriously love those little fellas! The texture and sweetness and flavour is just sensational. And in turn, he excitedly brought home a present a short time later - a bottle of Paraiso lychee liqueur. I sampled it by itself and immediately knew what it needed. It's like I could already taste it - aloe juice. I was making a margarita pie at the time, so I had an abundance of limes which would make the perfect kick through the sweetness.

I've experimented with different versions of this, adding a white rum to ramp up to booziness (the liqueur is weak in strength, strong in flavour) or soda water for a bit of spritzy freshness, but I always go back to the original. The tropical lychee and aloe flavour combination is remiscent of summer, and in this presentation, drinkable in winter!

So tonight, I sit in front of the heater, ugg boots on, and sip my Lychaloechee and dream of the balmy nights ahead! Cheers!


Lychaloechee
1 part Paraiso (or other lychee liqueur)
5 parts aloe vera juice
wheel of lime

Pour the Paraiso and aloe vera juice into a high ball glass, stir well to mix
Lightly squeeze the lime wheels into the glass, then drop in as a garnish


Sunday, May 26, 2013

One Dish, Two Ways - Italian Potato Salad/Italian Potato Bake

My cousin is about to head off on a European adventure, and seeing as she will be away for her birthday, she decided to have a bit of a get together before she went. I offered to bring a dish and was told maybe a potato salad. The rest of the food being served was going to be Italian, which got me thinking. Italian Potato Salad? Does such a thing exist? I've never eaten a potato salad made with Italian flavours - sounds like experiment time!

I guess I should say up front, that I've never been the hugest fan of potato salad. I think because a lot that I've eaten have had a really strong, overly 'mayonnaise-y' ness to them, and not a lot of content beyond boiled potatoes and peas. And boiled potatoes are one of the blandest foods in the world. I like to pimp mine out a bit more. 

The previous night I had fried up some hot salami with slices of garlic for a different dish and thought that was the perfect start for Italian Potato Salad. I didn't have enough potato to make a salad large enough to share, so I added some sweet potato to the mix. And I had an abundance of red capsicums, so I roasted up a few to add a lovely sweetness and new texture to the mix. The sauce was made simply with greek yoghurt, dried oregano, sun dried tomatoes and seeded mustard. The result was pretty darn impressive. Something I would eat a whole plate of as a meal.

Unfortunately (but luckily for me), it was forgotten in the fridge at the party, and I got to take it home with me. Being a cold night, and my husband hoping for a hot dinner asked - could it be heated? Well...yes. The sauce is just greek yoghurt. I don't see why not! I poured the whole thing into an oven dish, added some thinly sliced Provolone cheese and baked it for 20 minutes until warmed through and the cheese was golden. Heaven!

So here's a dinner perfect two ways - Italian Potato Salad and Italian Potato Bake. (I forgot to take photos of it until it was out of the oven. Sorry!)


Italian Potato Salad/Bake
6 baby potatoes, quartered
2 small sweet potatoes, cut to similar size
2 small red capsicum
half hot salami sausage, thinly diced
2 large cloves garlic, sliced
300g Greek Yoghurt
1/2 teaspoon dried oregano
1/2 teaspoon smoked paprika
5 sun-dried tomatoes
2 teaspoons whole-seed mustard

Put the potatoes into a pot of water and bring to the boil. Once boiling, add the sweet potato. When potatoes are tender, but not completely soft, strain out water and rinse with cold water to stop cooking. Store in fresh cold water until ready to assemble.

Meanwhile, roast the capsicums in a hot oven until the skin starts blistering. Place in a bowl and cover with plastic wrap to sweat a few minutes so you can peel the skin off. Discard innards and slice into strips. Set aside to cool.

Fry the salami in a medium hot pan, once starting to crispen and release oils, add the garlic slices and cook until everything is toasty. Drain really well on paper towels.

To make the sauce, blend the greek yoghurt, oregano, paprika and sundried tomatoes in a food processor or blender until well mixed and the tomatoes are chopped. Add the mustard and pulse a few times to distribute.

Combine all of the ingredients and add the sauce a bit at a time to ensure it's not too saucy. I ended up with too much sauce. Serve as potato salad.

To make the bake:
Heat oven to 180c
Pour potato salad into a casserole dish, add Provolone slices or thinly sliced/grated cheese of choice over the top and bake for 20 minutes or so until cheese is toasty and the sauce bubbles slightly add the edges.

This photo is of it served to the rear with a super-quick seafood marinara pasta I cooked while the potato salad became a potato bake!

Monday, May 20, 2013

Mothers' Day Celebration Cake - Gâteau de Bayou with Toasty Salted Caramel Meringue


On top of forgetting to write down recipes I concoct for repeat cooking, I also have a huge stash of 'one day' recipes. These usually fall into two categories; difficult or time consuming to make - such as the slow cooked Puerco Pibil I discussed here. And cakes. Because when there's only two of us at home, we don't ever really need a whole cake. And I don't really want to be that person who constantly brings cake to work, so I usually limit my baking exploits to biscuits that my husband can take to work. But my brother, husband and I were putting on a late lunch/early dinner (linner!) for Mothers' Day a few weekends back. What more perfect reason to go through my 'one day' cake recipes?

This recipe I 'filed' away by copying the link and saving it in an email draft in 2011. Almost 2 years later (and after having received a creme brulee torch as a gift), it was time to bring it out. This was one of the birthday cakes on Oprah's 10th Birthday Season special and it appeals to two of my favourite sweet flavours - ginger and salted caramel. I made the cake Saturday afternoon and then the meringue the next day. And it was a huge hit. Visually, it's impressive, but tastewise it is too! The sweet of the meringue balances out against the spice of the ginger perfectly. But to be honest, the cake was at it's best for morning tea on Monday. I'm not sure if it was legitimately because the flavours develop more, or I hadn't stuffed myself full of food already, or because cake makes my work day better, or a combination of all of them. Either way, stored in an airtight container, it definitely stayed moist and delicious for a few days.

As with a lot of American recipes, I've had to make some substitutions due to lack of availability in Perth, but apart from that, it's just the recipe found on Oprah's site


Gâteau de Bayou with Toasty Salted Caramel Meringue
2 tbsp fresh grated ginger
3 3/4 cups plain flour
1 tbsp baking soda
2 tsp salt
1 tsp ground cinnamon
1 tsp freshly ground black pepper
1 2/3 cup maple syrup
1 1/3 cups rice bran oil
1 1/4 cups brown sugar
3 large eggs
2 tsp Tabasco sauce

4 large egg whites, at room temperature
1 tsp salt
1 cup sugar
1/2 cup light corn syrup

To make cake
Combine ginger and 1 1/3 cups of water in a small saucepan. Bring to a boil over medium-high heat. Remove from heat and let stand for 5 minutes for the ginger to infuse. Set a sieve over a bowl and strain, pressuing the pulp with a spoon to get all the liquid out. Discard the pulp and let the ginger water cool.

Preheat oven to 170C. Grease a 10 inch Bundt pan with butter. Dust with a few tbsp plain flour, tapping out the excess.

Whisk together 3 3/4 cups flour, baking soda, salt, cinnamon and pepper in a bowl.

Combine 1 1/3 cups maple syrup, oil, brown sugar and ginger water in another bowl. Whisk until blended. Whisk in eggs, one at a time, and then the hot sauce. Add flour mixture and beat together with a hand mixer on low until it's smooth. Pour into the Bundt pan.

Bake 50-55 minutes of until a toothpick comes out clean. Cool in the pan for 10 minutes, then unmold onto a cake rack. Poke holes into the cake with a long wooden skewer and brush the warm cake with the remaining 1/3 cup of maple syrup. Let cool.

To make meringue
It's best if you have a stand mixer - I don't, so this is sort of a two-person job.

Using a hand beater with whisk attachment, beat egg whites, salt and 1/4 cup sugar on medium high until soft peaks form.

Combine remaining 3/4 cup sugar and 1/3 cup water in small saucepan. Bring to a boil over medium-high heat, swirling pan occasionally to dissolve sugar. Cook until syrup is dark amber - about 10 minutes. Stir in corn syrup, mixture will bubble. Cook, without stirring, until the syrup is 240F on a candy thermometer.

Two people part! One person holds the bowl and beats the egg white mixture on low speed. Second person pours the caramel into egg white mixture in a thin stream. Don't let syrup touch whisk. Once all incorporated, increase speed and beat until thick enough to spread. About 2 minutes. While meringue is still warm, spread over cake with a large spatula, making peaks and swirls. With a creme brulee torch, brown the meringue.

Serve at room temperature.


Saturday, May 4, 2013

Quick Meals - BBQ Black Bean Pizza Sauce

In my mind, there are two things that make or break a pizza. The sauce and the cheese. If you get these two elements right, then the pizza will be good. The cheese is fairly self-explanatory - above all it needs to melt well. The sauce has to be the right amount of tangy, and there needs to be a decent enough amount of it. Normally I will make my own sauce out of passata, herbs, chilli and salt and pepper, but I was in the mood for something a bit different. Knowing I wanted pizza for dinner, and that we had a leftover steak from the night before that had been marinated in a Spur's Grill Basting that was going to form the meat portion of the toppings, I thought a BBQ pizza sauce was the go.

Lately, one of my favourite things to make is bean dips. Usually chick peas, white beans or a combination of the two are my go-to canned goods for dips. Just throw a tin in the food processor with a touch of oil, then some flavouring ingredients (sun-dried tomatoes, chilli and Italian herbs is a favourite) and you've got a delicious dip for pop-around visitors. I thought I'd use this as a base for my pizza sauce to ramp up the vege content of dinner without overloading the pizza with too many ingredients. The hickoryness of the sauce made me think more of Southern and Mexican style dishes, so I figured black beans was more the go.

I always have some Lebanese loaves in the freezer for use as pizza bases, but feel free to use whatever base you choose. The toppings were simple, and what I had to hand - steak, corn kernels, zucchini and jalapanenos. These are all interchangeable - remember, it's all about the sauce and the cheese. And the cheese I had was a Provolone. Most of the cheeses I use for cooking are made by Borrello Cheeses. I'm particularly fond of their romano, pecorino, provolone and bocconcini. Provolone melts perfectly and is my go-to pizza cheese.

The resulting pizza was amazing. A tangy, thick and creamy tasting sauce topped with freshly shaved provolone cheese. Add a glass of red wine, and it's the perfect cold night after a long day at work's meal. Notice the paper-lined trays - dishwasher still not replaced!


BBQ Black Bean Pizza Sauce
(makes 4 individual pizzas)
1 tin black beans
3/4 cup BBQ sauce of your choosing (I used Spur's Grill Basting, but would recommend any hickory flavoured one)
4 lebanese loaves
1 steak, cooked to your liking and thinly sliced
Half zucchini, thinly sliced
1 cup corn kernels
4 jalapenos, thinly sliced
1/2 Provolone cheese, thinly shaved

In a processor, blend the tin of black beans and BBQ sauce. Check for seasoning and consistency. It should be spreadable.

Spread a thick layer onto your lebanese loaves. Preheat oven to 180C.

Scatter over your chosen toppings, add cheese last.

Cook for 20 minutes or so until cheese is golden and melted.